The Player's Edge
By Troy Stetina
GuitarOne Issue 1 - 1995
Updated and rewritten (c) 2020 Troy Stetina
In this article I’ll be showing you a few ways to help get that edge in your playing technique. That means, of course, I'm going to be talking about practicing. Now I know this word often conjures up images of strict discipline and boring routine, but that's not what it's really about. Practicing can be--and should be--totally engaging and creative. It does require concentrated effort; I mean, you've got to put something in to get something out. But with the right approach, you can do in a matter of hours what might otherwise take you days or weeks to master. And when you see real improvement--sometimes within a matter of minutes--it's an inspiration like no other! This lesson is all about making the most out of your practice time so you can become the best player you can be. So let's get started and see how quickly you notice a difference in your playing. Hey, it might be sooner than you expect!
The Engine of Your Playing Technique
I think of the fretting hand, the left hand for most of us, as the engine of your playing technique because the left hand is involved in everything you play--it's at the heart of your technique. By contrast, the right hand may be involved a little, a lot, or even not at all. It depends on the articulation of the passage. But the left hand is basic. So let's start there and see what we can do.
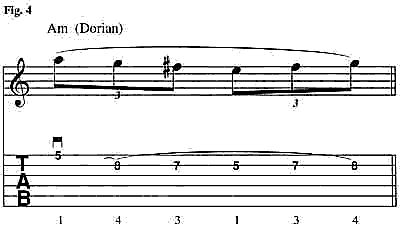
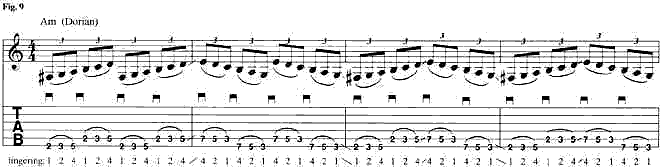
Figure 1, below, is a simple six-note pattern drawn from the minor scale. It is shown first in A minor, then Bm, Em, and finally Am again, an octave up. The first note is picked and the remaining five are sounded with hammer-ons and pull-offs. Memorize the pattern and make the notes clear and even. Practice until you can think of it as a single unit, instead of six separate notes.
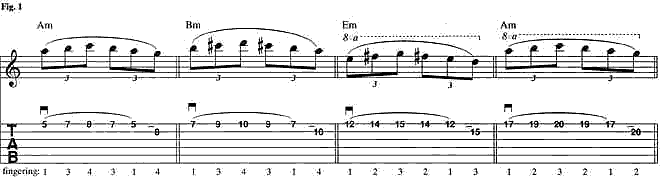
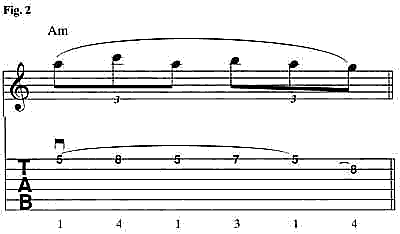
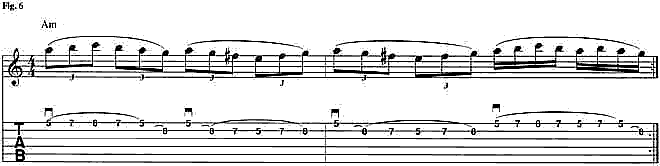
The next Figures--2, 3, and 4--show some variations on that simple pattern. To save space, they are written only in the Am position, but practice in each of the other positions as well. Don’t push too fast right away or you may just wind up just practicing a lot of mistakes! Speed it up gradually. Again, the key point here is to imprint each pattern onto your brain as a single thought. The reason for this will soon become apparent.

Next let's combine them all together in Figure 5, below. Here we're playing each of the previous figures back to back.
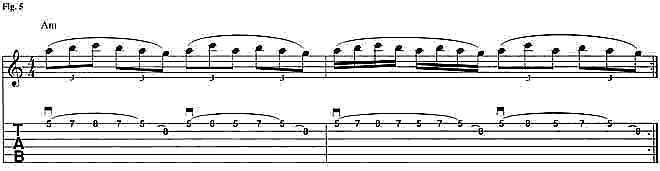
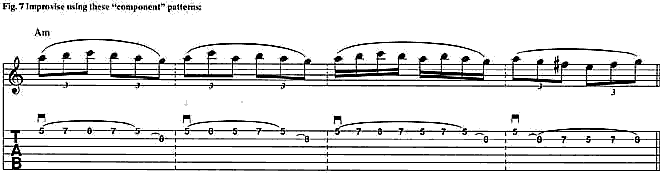
When you can play Figure 5, above, without getting mixed up, you’re ready to take the final plunge. Now try to improvise the patterns in various sequences as you play. Sure, you might have a few "brain locks" at first. But start slow, keep at it, and you'll get the hang of it. If you need some help getting started with this, try these repeating patterns first: Fig. 1, 2, 3, 1, 2, 3, etc.; Fig. 1, 2, 1, 3, etc.; Fig. 2, 3, 1, etc.; Fig. 1, 4, 2, 4, etc.; Fig. 1, 4, 3, etc. That should get things rolling. Then just make it up as you go. Believe me, it's worthwhile! After wrestling with this a bit, you'll soon notice a better flow in your left hand. The notes become more clear and even, yet they require less effort to play faster!
You see, looking for improvement in your technique is a lot like watching a clock. If you stare at it, nothing much seems to happen. But shift your attention to something else for a few minutes, then glance back at that minute hand and the movement is obvious. That's what is going on here. To start off, we paid attention to all the details. Then, we shifted our attention to a different level -- a higher order of thinking -- even as we kept our fingers working the same patterns. So your mind continues to be fully engaged and twenty or thirty minutes can blow by before you even realize it! Eventually, when your attention does come back to the details again -- your technique, that is -- you notice a distinct improvement! The minute hand has moved!
So you wind up practicing longer without getting bored. But there are other advantages, too. For one thing, it takes more concentration, which slows you down a bit at first. That's good because you make fewer mistakes and get the correct motions imprinted into your neural synapses better. But the most important advantage by far is that you gain a certain "liveliness" of ideas. You're practicing to think more quickly and creatively, calling on these patterns instantly and incorporating them into improvised licks. Now that's exactly the opposite of what happens with straight repetition -- There you tend to get "locked in" to seeing rigid patterns, which become disconnected to the rest of what you know. Too many boring drills can suck the excitement out of playing. Yeah, you need repetition, but you need some variety and creativity too. I mean, doesn't it make sense that in order to become more creative, you need to practice drawing on your creativity? It's a no-brainer!
OK, now let's look at a real-world application for these various patterns [Figs. 1-4]. Dimebag Darrell's lead flurry at the ending of "Shattered" (Pantera) is a good example. You'll notice parts of our patterns hiding in this lick, shown below in Figure 8. They are easy to incorporate into pentatonic-based licks because they blend so nicely with the basic minor pentatonic shape.

After practing that lick for a bit, I'm sure your left hand is really warmed up. So let’s stretch it out a bit more with the scale-oriented runs shown above in Figures 9 and 10. These use the eminently convenient three-notes-per-string approach with position shifting, in order to run up and down the scale.
And that brings us up to our monster lick for the left hand, by the master of left hand legato, Joe Satriani. This is from his opening solo in "Flying in a Blue Dream." The key to mastering this lick lies in breaking it into manageable parts. The brackets show how I would do it. So here's the plan: Practice each bracketed section as a repeating exercise in its own right, and make up some variations to boot. Then blend all of these together and whip up some improvised sequences just like we did earlier in this lesson. That should keep you busy for a while, at least!
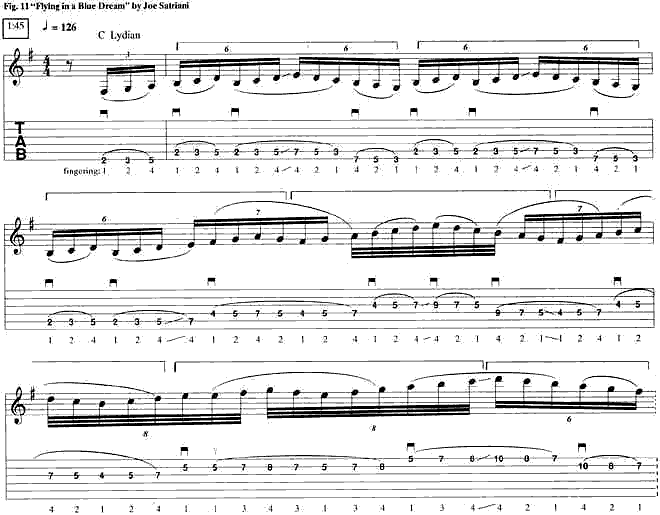
One more thing about that Satriani lick, though. I should give a piece of advice on how to deal with those annoyingly inconsistent rhythmic divisions. Ignore them! They are the result of simply cramming in the patterns as fast as possible, and coming out in time at the end of the phrase by feel. So don't make it any harder than it is. Think in terms of shape and don't get hung up on getting the rhythm "accurate." In fact, I'd encourage you to simply apply your own rhythmic divisions to each portion of the lick that is bracketed. Then you can really use these patterns in your own improvisation.
Well, you made it this far! Good job. For more left hand practice, check out the first section of Speed Mechanics for Lead Guitar. Next, we'll lay the groundwork for some killer right hand picking technique.
Intensity in the Palm of Your Hand
There just ain't no substitute for fast, consistently-picked runs. They're intense! Especially when played with distortion and a little palm muting. Of course, this also requires a more sophisticated synchronization between left and right hands. But there are a few shortcuts that can help get you up to speed without an eternity of practice. We'll start by building up speed and control where it's easiest, on one string at a time, and then we'll carry that technique over to crossing between strings.
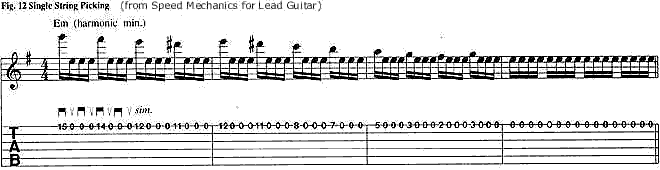
Our first right-hand example, Figure 12, is taken from Speed Mechanics for Lead Guitar. It stays on just one string at a time, so you can really concentrate on the picking. The key idea here is to make small, controlled motions using jsut the tip of the pick -- not too deep Playing quietly, with some palm muting, and use a metronome to keep tempo. Then repeat the same pattern on each string and crank up the speed. This one's actually not that hard to play fast, although it sounds pretty intense!
Now let's try picking six notes per string. The ascending lick shown as Figure 13 is taken from Dimebag Darrell's solo in "Cowboys From Hell" (Pantera). It races up the E minor pentatonic and E natural minor scale in repeating sets of three. First, memorize the left hand pattern, then crank up the speed! You shouldn't have any trouble picking this one almost as fast as the previous one. Just remember to keep the motions small.

Next we'll try picking a line using three notes per string. Moving between strings like this requires the pick to move farther in the same amount of time. Therefore it is difficult to maintain the same speed. Expect to take this one a little slower. Figure 14 shows the basic picking pattern. Start with a downstroke and lead with an upstroke to the next string. Some people have a tough time with this. If it's a problem for you, exaggerate the picking motion until you get it down. Then go back to small motions.
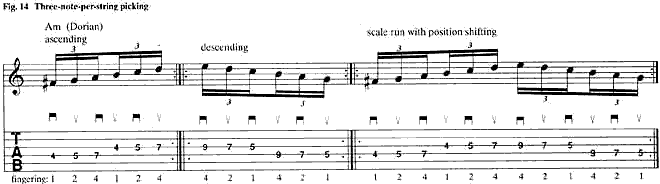
Three-note-per-string shapes are a great way to go for fast scale runs. As far as the right hand is concerned, you are just repeating the same pattern of six -- three on each string -- over and over. So all you have to do is get that figure fast and you can burn on just about any scale! Figure 15 demonstrates with a run in A harmonic minor.

Getting There from Here
By this point you have likely already seen at least some improvement in your speed and control in both your left hand and right hands. But is there anything you can do to get these techniques down a little quicker? Actually, there are a number of different things that can make a big difference in how quickly you improve. In Part 2, I'll outline one such method that I like to use.
Creating Speed Exercises
There are a number of different methods of practicing--I call them practice techniques--that can make a big difference in how quickly you improve. Here I'll outline an important and useful one of them, speed exercises.Whenever you come across a new lick that you do not yet have the technical capability to play at the tempo you'd like:
-
Break it down. Isolate a relatively small mechanical pattern or portion of the lick; just one or two beats even.
-
Memorize the pattern. Only after you have it memorized can real technique improvement begin.
-
Expand the pattern. Don't play it forever in the same place or you'll bum out quickly. Play it, say, eight times in each position, then shift it up a fret, all the way up and back down the neck. Now you've got something to work with! And as you are doing this. . .
-
Think small. Remember that distance equals time. Concentrate on making small, relatively relaxed motions. Play quietly and let the amp make it sound intense.
Now you're ready to start practicing the patterns you've isolated from the lick as speed exercises and build up your technique.
-
Find your speed "barrier." Play along with a metronome, gradually increase the tempo a few notches at a time. Eventually you'll reach a point where your right hand begins to tense up more and you feel you can't push it any faster and keep it smooth.
-
Push through, focus, fall back. Push the speed up one notch more and focus on reducing the tension and excess movement. Then after a bit, slow back down a notch or two into your safe zone for a while. Then push it again. Then slow down. Over and over.
-
Lay back a little, too. If you push it all the time, you'll get speed but you'll tend to lack control. You want both. So spend some time pushing the barrier, but then spend some time connecting it back to what you can do comfortably. In other words, you're blurring the lines every time you move back and forth through that "barrier." And don't focus so much on pushing the speed, but rather reducing the motion because when that happens you'll find that your speed increases easily and automatically. There is less tension when you teach your muscles how to work more efficiently, and your speed "barrier" rises. It's a mental game.
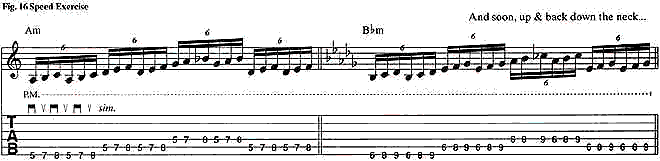
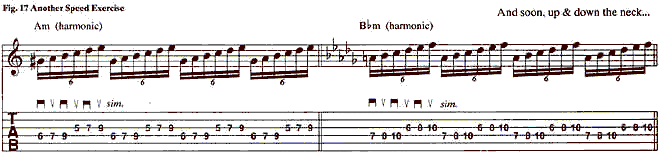
So now that you know how to do these speed exercises, you just need something to do it to. Try it on Figures 16 and 17, below. Here I've isolated a few segments of earlier examples, so you can get an idea how to break down licks for this kind of speed-exercise practice.
Of course any pattern you want to be able to play faster could be practiced as a speed exercise using these guidelines. How about going back to the previous examples shown in Parts 1 and 2 and breaking them down into speed exercises? And try the same thing with the next difficult lick you come across. Give it a shot and let me know how it goes. I think you'll like the results.
Of course, this is just one practice technique. You can find more in "The Art of Practicing" section of Speed Mechanics. And don't forget about that improvisational approach I showed you earlier in Part 1. There's another practice technique.
Well, I'd say that's a full dose. Keep it creative and I'll see you next time!
For more on developing left and right hand technique and building speed, see Speed Mechanics for Lead Guitar. For more speed exercises, see Metal Lead Guitar Volume 1 and Volume 2. For speed as it relates more to rhythm playing, check out Thrash Guitar Method.